Tuesday, June 11, 2019

Json extractor and While loop


Waiting for a specific value in response of api request. using while loop.
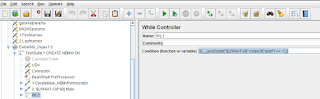
Add a While Loop.
The api requets will be executed inside the While loop and the response will be parsed.
Because we are looking for a specific ID value in the response, and the value always contains a common string i.e., aebf
so we added this code which will execute the request inside While loop till it finds the value of Id which will get fetched inside the variable: $JWAAT-Id

Once found the next call outside the while loop will start.
                       ${__javaScript("${JWAAT-Id}".indexOf("aebf") == -1,)}


Tuesday, February 12, 2019

FAST TRACK RELEASE MANAGEMENT (3 to 4 months)


REQUIREMENTS GATHERING, DEVELOPMENT & TESTING IN AGILE -
[NEW PRODUCT]

Starting from Iteration 1 and developing till the final iteration.
As the image above shows, the project development is done from iteration 1 till final iteration 8.
Each time a new layer of new feature/functionality is added to the existing project.

Requirements, development and testing all are iteratively done and in end, collective release advice is given.

1. Plan Release - 

Plan a small release every 3 to 4 months. It is wiser to develop small features, test them and release them.
keep new development in control and use a small steps approach.
when developing small features/functionalities then we have more control. We can use the client feedback to further develop in next iterations. Chances of making mistakes are less. And if any problems are noticed, then its always easier to manage a small release.

Delivering a large functionality is always a risk in long run for stakeholders.

Start in 2-Jan 2018 Week 1, 2: 
Tasks:
preparation and plan.


2. Gather Requirements - 


1. keep the cycle of requirements gathering Short.
Gather requirements in a time-boxed manner. This means that you decide a specific number of days for requirements gathering and do not extend them.

Tip1: Make use of requirements management tools like  Rational Doors.
https://en.wikipedia.org/wiki/Rational_DOORS


Tip2: Include the client in the team and ask to perform the task of requirement gathering on a high level. assign Business analysts and Functional analysts under him and ask to finely define the high-level requirements.

Example Case 1
Start in 15-Jan 2018 Week 3, 4: 
Tasks:
  • preparation, interview client 
  • Collect requirements, 
  • draft and propose version.

3. Review requirements - 

Start the requirements review phase. This is a mandatory phase.
  where the team reviews the requirements in a formal way and notes down the comments or questions and answers.
  sometimes a rework is required and also some extra details are required. So these can be collected as part of the review phase.

For example - 3 days for review and 2 days for any rework or changes.
This way the stakeholders/managers get the assurance that the requirements have been read and understood by the team and are ready as the basis for the development. Now the requirements collection is complete.
Tip: Use the standard template for the review process.

Who is involved in the Review process;
1. Software architect
2. Software lead developer
3. Test Manager/Test coordinator/Test Lead.

Example Case 1
Start in 29-Jan 2018 Week 5, 6: 
Tasks:
present requirements,
Collect feedback/questions.
update the draft and create a proposed version.

Develop - 

Once the requirements are reviewed and finalized. Now its time to start development. Using the agile way for development split the set of requirements into small user stories and distribute them over the span of project development time.  

It is important that at end of each sprint the feature developed can be verified by the test department.
This verification is essential in order to set the user story on Done

We cannot put the status of a user story on done, until and unless the user story is tested and no major bugs are open.
This process step will ensure the stakeholders that steady progress is made and no open ends are left.

Example Case 1
Start in 11-Feb 2018 Week 7, 8,9,10,11: 
Tasks:
  • split requirements into small user stories.
  • plan, assign and develop, 
  • unit test.
  • deploy software for testing.

Code Review - 

Often the stakeholders are left with some risks and lack of assurance. Some common questions popping in minds are like:
  • Is the project code suitable for future enhancements?
  • Is the architecture future proof?
  • Are we able to quickly adapt the solution when a new change request or a new feature demand is raised?
  • Assurance that we are not making a house of cards.

Example Case 1
Start in 04-March 2018 Week 10,11: 
Tasks:
preparation, interview client 
Collect requirements, 
draft and propose version.


Test & Retest - 


Example Case 1
Start in 18-March 2018 Week 7, 8,9
Tasks:
Create test plan, test cases.
Prepare test data,

Start in 18-March 2018 Week 10,11,12: 
Tasks:

  • Automate tests where possible, execute tests - manual and automated.
  • Generate test report
  • Execute Factory acceptance tests FAT and Retest+Reruns, bug fix tests.
  • Execute Integrated Factory Acceptance tests E2E,
  • Generate test report, 
  • Give internal release advice for starting UAT.

UAT & Release.


Example Case 1
Start in 26-March 2018 Week 12: 
Tasks:
Prepare tests,
Execute tests with client,
collect feedback. (replan if needed)
create change requests or bugs. define strategy and acceptance of these issues.
plan effort - if minor development include in release.
                  - if major development include in next version of release.
Give Final release advice.

Software Released on 1-April 2018


Thursday, August 24, 2017

JENKINS Time based Scheduling the Test run


# Starting nightly builds for regression testing in continous integration.

Step1:
Add a new Jenkins job.
select : Freestyle project.

Step2:
In "build Triggers"
select checkbox : Build Periodically.
enter the following : 15 13 * * *

this will auto schedule the jenkins job to start the build every day of every month of every year at the 15th minute of the 13th hour of the day.

The Jenkins used is a cron expression, the different fields are :

MINUTES Minutes in one hour (0-59)
HOURS Hours in one day (0-23)
DAYMONTH Day in a month (1-31)
MONTH Month in a year (1-12)
DAYWEEK Day of the week (0-7) where 0 and 7 are sunday

If you want to schedule your build every 5 minutes, this will do the job : */5 * * * *

If you want to schedule your build every day at 8h00, this will do the job : 0 8 * * *

Jenkins lets you set up multiple times, separated by line breaks.
If you need it to build daily at 7am, along with every Sunday at 4pm, the below works well

H 7 * * *
H 16 * * 0


step3:
In build: select "execute windows batch command"
add the path to the batch file like :

C:\Users\Administrator\Desktop\testbatchfile\MQTT_ENERGY.bat

step4:
save.

-------------------------------
#Two ways to Set the duration of the test  :
1a. by adding the "scheduler" in the Thread group.
1b. And adding the value in the user.properties
duration=3600
'OR'
2. the test duration value can be provided in realtime at time of test execution via cmd. this value then overwrites the user.properties duration property.
-------------------------------

Friday, July 7, 2017

Achieving targetted Requests per minute.

Achieving desired Requests per minute

If the Jmeter test is not able to send the expected Number of requests per minute then the following could the reasons:

REASONS WHY LESS REQUETS PER MINUTE ARE SENT VIA TEST
1. Number of request per minute will be lower if the server is not capable of handling it.
2. There's also going to be problems, especially with latency - even if you could send exactly 6 per second, they're going to be sent sequentially (that's just how packets get sent) and may not all hit in that second, plus processing time.
3. API-buffer overflow: Generally when performance metrics specific x per second, it is measured over a period of time. Your API may even have a buffer - so you could technically send 6 per second, but process 5 per second, with a buffer of 20, meaning it'd be fine for 20 seconds of traffic, as you'd have sent 120, which would take 120/5 = 24 seconds to process. But any more than that would overflow the buffer. Therefore, to just send exactly 6 in a second to test is insufficient.

CHECKS:
1. Check the JVM size in jmeter test.
Set HEAP=-Xms2560m -Xmx5120m

2. Run incremental Load like 50, 60, 80,100,110 monitor the JVM and decide how many injectors (separate jmeter instances) are required. Based on that split the load into multiple injectors and run simultaneously.

3. Try with Constant throughtput timer – to add a value for the RPM-requests per minute that are expected for a certain scenario.


Wednesday, April 6, 2016

Certificate for WSO2 - identity Server


1.Export the Certificate for the Identity server login site.


2. Import this certificate.


3. After import the certificate is available.


4. check in the browser.


Tuesday, April 5, 2016

Automated Regression test for Verification of XACML Policy responses (WSO2 carbon product platform)


XACML, shortened for extensible access control markup language, provides a flexible, fine-grained and scalable way of achieving policy-based access control. WSO2 carbon product platform provides a fine-grained access management solution with Policy Based Access Control (PBAC) based on XACML.

There are different mechanisms in use but they also have some drawbacks. Mechanisms like :
- User Centric Permission
- Role Based Access Control
- Attribute Based Access Control

have main Drawbacks like :
- non-scalability,
- coarse-grained permission and authorization logic being coupled with application logic which prevents flexibility.


Solution :

Policy-Based Access Control (PBAC).

This is emerging as a flexible and scalable solution for access management. XACML is a powerful way of achieving PBAC in a fine grained manner.


Steps to Setup:
Step1. Setup Identity Server. Configure MySQL database as WSO2 Identity Server’s data store.

Step2. Create XACML policies and XACML requests using tool.

Step3. Upload XACML policies in to Identity Server.

Step4. Configure script in test environment.

- Send call to specific Endpoint defined on IS. Use the soap envelop example:

POST data:
<soapenv:Envelope xmlns:soapenv="http://schemas.xmlsoap.org/soap/envelope/" xmlns:xsd="http://org.apache.axis2/xsd">
   <soapenv:Header/>
   <soapenv:Body>
      <xsd:getPolicy>
         <!--Optional:-->
         <xsd:policyId>Test-Scenario-4</xsd:policyId>
         <!--Optional:-->
         <xsd:isPDPPolicy>true</xsd:isPDPPolicy>
      </xsd:getPolicy>
   </soapenv:Body>
</soapenv:Envelope>

 *****************
A parameterized policy example :

2.Single Permission, multiple groups, single rule

Parameters:

Policy id = $RAHULSPolicyId
Group name 1 = $RAHULSGroup1
Group name 2 = $RAHULSGroup2
Permission = $RAHULSPermission
Rule = $RAHULSRule

<Policy xmlns="urn:oasis:names:tc:xacml:3.0:core:schema:wd-17"  PolicyId="$PolicyId" RuleCombiningAlgId="urn:oasis:names:tc:xacml:3.0:rule-combining-algorithm:deny-overrides" Version="1.0">
   <Target>
      <AnyOf>
         <AllOf>
            <Match MatchId="urn:oasis:names:tc:xacml:1.0:function:string-equal">
               <AttributeValue DataType="http://www.w3.org/2001/XMLSchema#string">$RAHULSPolicyId</AttributeValue>
               <AttributeDesignator AttributeId="urn:oasis:names:tc:xacml:1.0:resource:resource-id" Category="urn:oasis:names:tc:xacml:3.0:attribute-category:resource" DataType="http://www.w3.org/2001/XMLSchema#string" MustBePresent="true"></AttributeDesignator>
            </Match>
         </AllOf>
      </AnyOf>
   </Target>
   <Rule Effect="Permit" RuleId="$Rule">
      <Target>
         <AnyOf>
            <AllOf>
               <Match MatchId="urn:oasis:names:tc:xacml:1.0:function:string-equal">
                  <AttributeValue DataType="http://www.w3.org/2001/XMLSchema#string">$RAHULSPermission</AttributeValue>
                  <AttributeDesignator AttributeId="urn:oasis:names:tc:xacml:1.0:action:action-id" Category="urn:oasis:names:tc:xacml:3.0:attribute-category:action" DataType="http://www.w3.org/2001/XMLSchema#string" MustBePresent="true"></AttributeDesignator>
               </Match>
            </AllOf>
         </AnyOf>
      </Target>
      <Condition>
         <Apply FunctionId="urn:oasis:names:tc:xacml:1.0:function:string-at-least-one-member-of">
            <Apply FunctionId="urn:oasis:names:tc:xacml:1.0:function:string-bag">
               <AttributeValue DataType="http://www.w3.org/2001/XMLSchema#string">$RAHULSGroup1</AttributeValue>
  <AttributeValue DataType="http://www.w3.org/2001/XMLSchema#string">$RAHULSGroup2</AttributeValue>
            </Apply>
            <AttributeDesignator AttributeId="http://wso2.org/claims/role" Category="urn:oasis:names:tc:xacml:1.0:subject-category:access-subject" DataType="http://www.w3.org/2001/XMLSchema#string" MustBePresent="true"></AttributeDesignator>
         </Apply>
      </Condition>
   </Rule>
</Policy>    
**********************
- In this simple example, the policyId is checked and the response can be asserted for attribute values.
- Further when the call is sent to the Endpoint it will check the policy and revert with a response message. This response contains: policy and the attributes canbe verified. This scenario can be added to the regression test suite to ensure that all policy's are fine after a patch/update of Identity server/bug fix etc.,
- Parse the response on the attribute values and check if the policy is correct.
- similarly Soap message can be used for other attributes of the XACML Requests : Subject, Resource, Action.  

Monday, March 14, 2016

Handling NTLM authentication in test automation - Single Sign ON

CASE: 
There are many times situations where you have to switch between login accounts to execute a Test scenario. If the application is using SAML then it is not a problem. But what if the Application is using single sign on / NTLM authentication mechanism.

Understanding NTLM
NTLM is a suite of authentication and session security protocols used in various Microsoft network protocol implementations and supported by the NTLM Security Support Provider ("NTLMSSP"). Originally used for authentication and negotiation of secure DCE/RPC, NTLM is also used throughout Microsoft's systems as an integrated single sign-on mechanism. It is probably best recognized as part of the "Integrated Windows Authentication" stack for HTTP authentication; however, it is also used in Microsoft implementations of SMTP, POP3, IMAP (all part of Exchange), CIFS/SMB, Telnet, SIP, and possibly others.
The NTLM Security Support Provider provides authentication, integrity, and confidentiality services within the Window Security Support Provider Interface (SSPI) framework. SSPI specifies a core set of security functionality that is implemented by supporting providers; the NTLMSSP is such a provider. The SSPI specifies, and the NTLMSSP implements, the following core operations:

  1. Authentication -- NTLM provides a challenge-response authentication mechanism, in which clients are able to prove their identities without sending a password to the server.
  2. Signing -- The NTLMSSP provides a means of applying a digital "signature" to a message. This ensures that the signed message has not been modified (either accidentally or intentionally) and that that signing party has knowledge of a shared secret. NTLM implements a symmetric signature scheme (Message Authentication Code, or MAC); that is, a valid signature can only be generated and verified by parties that possess the common shared key.
  3. Sealing -- The NTLMSSP implements a symmetric-key encryption mechanism, which provides message confidentiality. In the case of NTLM, sealing also implies signing (a signed message is not necessarily sealed, but all sealed messages are signed).
NTLM has been largely supplanted by Kerberos as the authentication protocol of choice for domain-based scenarios. However, Kerberos is a trusted-third-party scheme, and cannot be used in situations where no trusted third party exists; for example, member servers (servers that are not part of a domain), local accounts, and authentication to resources in an untrusted domain. In such scenarios, NTLM continues to be the primary authentication mechanism (and likely will be for a long time).


Solution: 

HTTP sampler settings: JAVA
now java uses the single sign on user account with which you have logged into the laptop or test server. so while test execution or capturing the calls you might need to log into as a other user. 

You can check if the application is using  NTLM Authentication or not in Firefox (F12)/ Developer 
  : Network: Headers--> Request Headers of the login page call.


so to do so follow this :

open cmd and execute:

c:\RahulAgnihotri\apache-jmeter-2.13\bin>runas /user:ICS\ex000222002212 cmd

now in the new cmd execute:


c:\RahulAgnihotri\apache-jmeter-2.13\bin>jmeter.bat

Now you can proceed as this other user. Firefox will log in as a new ex000222002212
Start Task manager : Java process will be running with new user now: ex000222002212

Tuesday, March 8, 2016

Friday, March 4, 2016

Automate Ajax Login mechanism


For Automating Ajax Login :
1. Add Authorization manager with mechanism: BASIC_DIGEST.
2. use JAVA instead of httpclient 4 or 3.1


Wednesday, February 17, 2016

TESTING IN PHASES


PHASE BASED DEVELOPMENT AND TESTING

- Creating new regression test set from previous Phase's test run.


WSO2 Identity server Test automation

This article describes and provides insights into creating Dynamic input based fully Automated test for user scenario testing for - WSO2 identity server authentication (involving authorization mechanisms like SAML2, OAUTH, JWT token)

Some common steps which can be 100% automated are as follows:

- A request for SAML2 authentication request. redirecting the user, using the returned URI, towards the Identity server.

- The returned value is an URI. It is expected from the web application to redirect the user towards the returned URI.

Re-direct based authentication using SAML2, SAML2 authentication request,JWT token verification - real time accessing of JWT token, API key.WSO2 Identity Server.

- user redirected the login-page of the Identity Server. 

- The API Engine receives the authentication response on a callback endpoint. After parsing and validation of the response. 
- API Gateway generated JWT token [complying RFC7519 and uses HMAC-256 digest and signature algorithm.] .
--  the JWT tokenis provided back to the Web application.
checking the JWT token from browser:Resources -->session Storage.

This is what you need to automate in real time each time the test executes.

JWT token can be decoded using the jwt.io for checking credentials.


Redirected command can also be retieved the same way in real time.
so each time a new jwt token is generated it is captured and pushed in with new call in the test script.


same way in callback saml response can be retieved and further channeled into calls.


Monday, November 23, 2015

How to disable internet explorer enhanced security configuration on windows 2008 R2


{if you are getting a lot of problem with pop pus from IE and you cannot install java from hard disk/ or access any site this might help}


  1. Go to Control panel
  2. click at Server manager
  3.  In there click at IE enhance security configuration, and now set it to OFF. see screenshot below!


Monday, May 5, 2014

Creating Free Test Replica Machine. Costs : 0 $


Converting a Local machine or a virtual machine into Portable Virtual Machine which can be runned on VMware Player.
Create Portable Virtual machine for VMware Player.

1. Converting VM Virtual machine into a Virtual machine for VMware Player.
2. Selected not all the Drive. Just c: is selected while conversion to get only software’s installed.
3. Because the Space on the VM was not enough for itself. So I mapped the local drive to this VM and the converted disk will be saved on Local drive Z:\ in RA folder


TroubleShooting:  
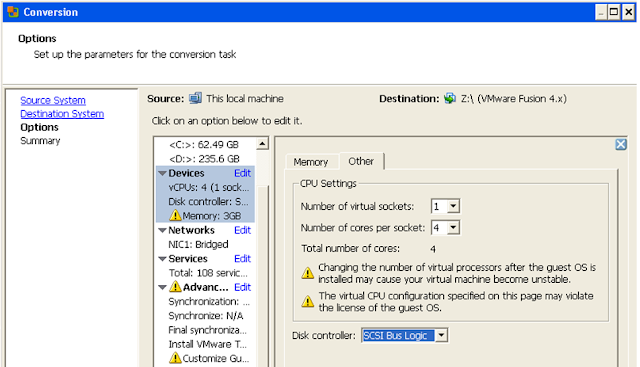
When after Converting a windows XP/win 7 machine you start the machine in VMware Player and it shows the Blue screen and reboots again. This problem can be fixed by selecting:

When you start converting the standalone machine ,
In third step : OPTIONS : select Devices and in Disk Controller: SCSI Bus Logic. And go further and let it make the machine.
Note: I was making the conversion  for Vmware Player version 4.0.X so you need to select the specific version in previous step.


Machine is created and process is complete.


Machine is made and completed.. ready to be used in VMWARE Player.


Running 2 different VM’s on Local system and all connected.
VM1: windows XP running in VMware player.
VM2: Windows 2008 server R2 running in VMware player.
my web browser is pointing to VM1 and my browser is running on Local machine-Laptop.
I configured & connected using:
In the VPC image in VMware player and set both to use HOST only.
Doing this the VMs will recognize each other and also the HOST but they will not see outside of my machine.
So no impact from outside world, tests will be executed in protected environment.

 Note : If you choose NAT then the VMs can access outside your HOST (machine running the VMs) if your HOST has internet/network access.


Tuesday, April 29, 2014

Adapting Automatic Selenium test scripts to use Internet Explorer (IE) and Firefox

for Executing the Automated C# scripts for my tests I used the following code:

To RUN the same test in Internet explorer, a small change will be sufficient to execute similarly.see following code replacement :


To run the test for a different browser, simply supply the name of the browser as the second argument. For example, *iexploreuses Internet Explorer as the browser instead of Firefox. Use *opera for the Opera browser or *safari for Apple Safari.
Note that the browser must be supported on the operating system on which you are running the tests. You will get exceptions and, therefore, failed tests if you attempt to execute tests for a browser that doesn't exist on your operating system, such as*safari or *iexplore on a system running Linux®.

Enable Selenium Commands in Firefox

In some applications, the javascript replaces or disables the context menu's.
As a result of this the Commands of selenium do not work and you get test errors.
Simple way to fix this is simply unselecting the "Disable or replace context menus" checkbox and reload the page.
this is the easiest and fastest way to get things working.

Supporting two Gui's for QTP11.00 tests - Qualitycentre 10.00

setting the environmnet variable on the QTP machine to support two types of GUI's
thus the same machine can then be used for both the nighty builds. only in the qtp init function i added the code where it is checked what gui type is it. for both specific tests a specific gui tpe: new or old is set using the environment variables file in qtp and then with help of windows env variable this value is compared and overwritten for test executions.


Sunday, February 23, 2014

JMETER HEAP adjustment

When you are unable to add largeer messages in JMETER, and you get the following error:


then you need to increase the standard setting of HEAP  in jmeter.bat

FROM:   set HEAP=-Xms512m -Xmx512m
TO : set HEAP=-Xms512m -Xmx1024m


For example: if you want to set the maximum heap size to 4 gigabytes, you’ll need to change the line to: HEAP="-Xms512m -Xmx4096m"

another efficient way to execute script is:
You can execute JMeter test from the command line. It is as simple as

jmeter -n -t Rahulstest script_number202.jmx

Sunday, June 23, 2013

Installing Python and dependencies in Linux


Downloading python and dependencies.

Installing Python


Step0:open the Terminal on ubuntu 10.04. and enter the following steps. get dependencies.
Step1:
sudo apt-get install build-essential
Step2:
sudo apt-get install libreadline-gplv2-dev libncursesw5-dev libssl-dev libsqlite3-dev tk-dev libgdbm-dev libc6-dev libbz2-dev
Step3:get software fom website of python
(or you can also download directly from browser to download folder)

cd Downloads/
wget http://python.org/ftp/python/2.7.3/Python-2.7.3.tgz

Step4:Extract and go to the dirctory
tar -xvf Python-2.7.3.tgz && cd Python-2.7.3/

Step5:Now install using the command:(logged in as administrator or root)
./configure
make
sudo make altinstall


Step6: Installing : IDLE Editor for using Python on ubuntu 2.10
cd /home/administrator/Downloads/python2.7.3/Python-2.7.3/Tools
sudo apt-get install idle

Step7: starting editor IDLE in python
idle

Step8: open a new file in idel and name it as Rahultest.py
and write a small program and get it printed. as shown in images below:


Json extractor and While loop

Waiting for a specific value in response of api request. using while loop. Add a While Loop. The api requets will be executed inside th...